Zixi × AWS Video Pipeline
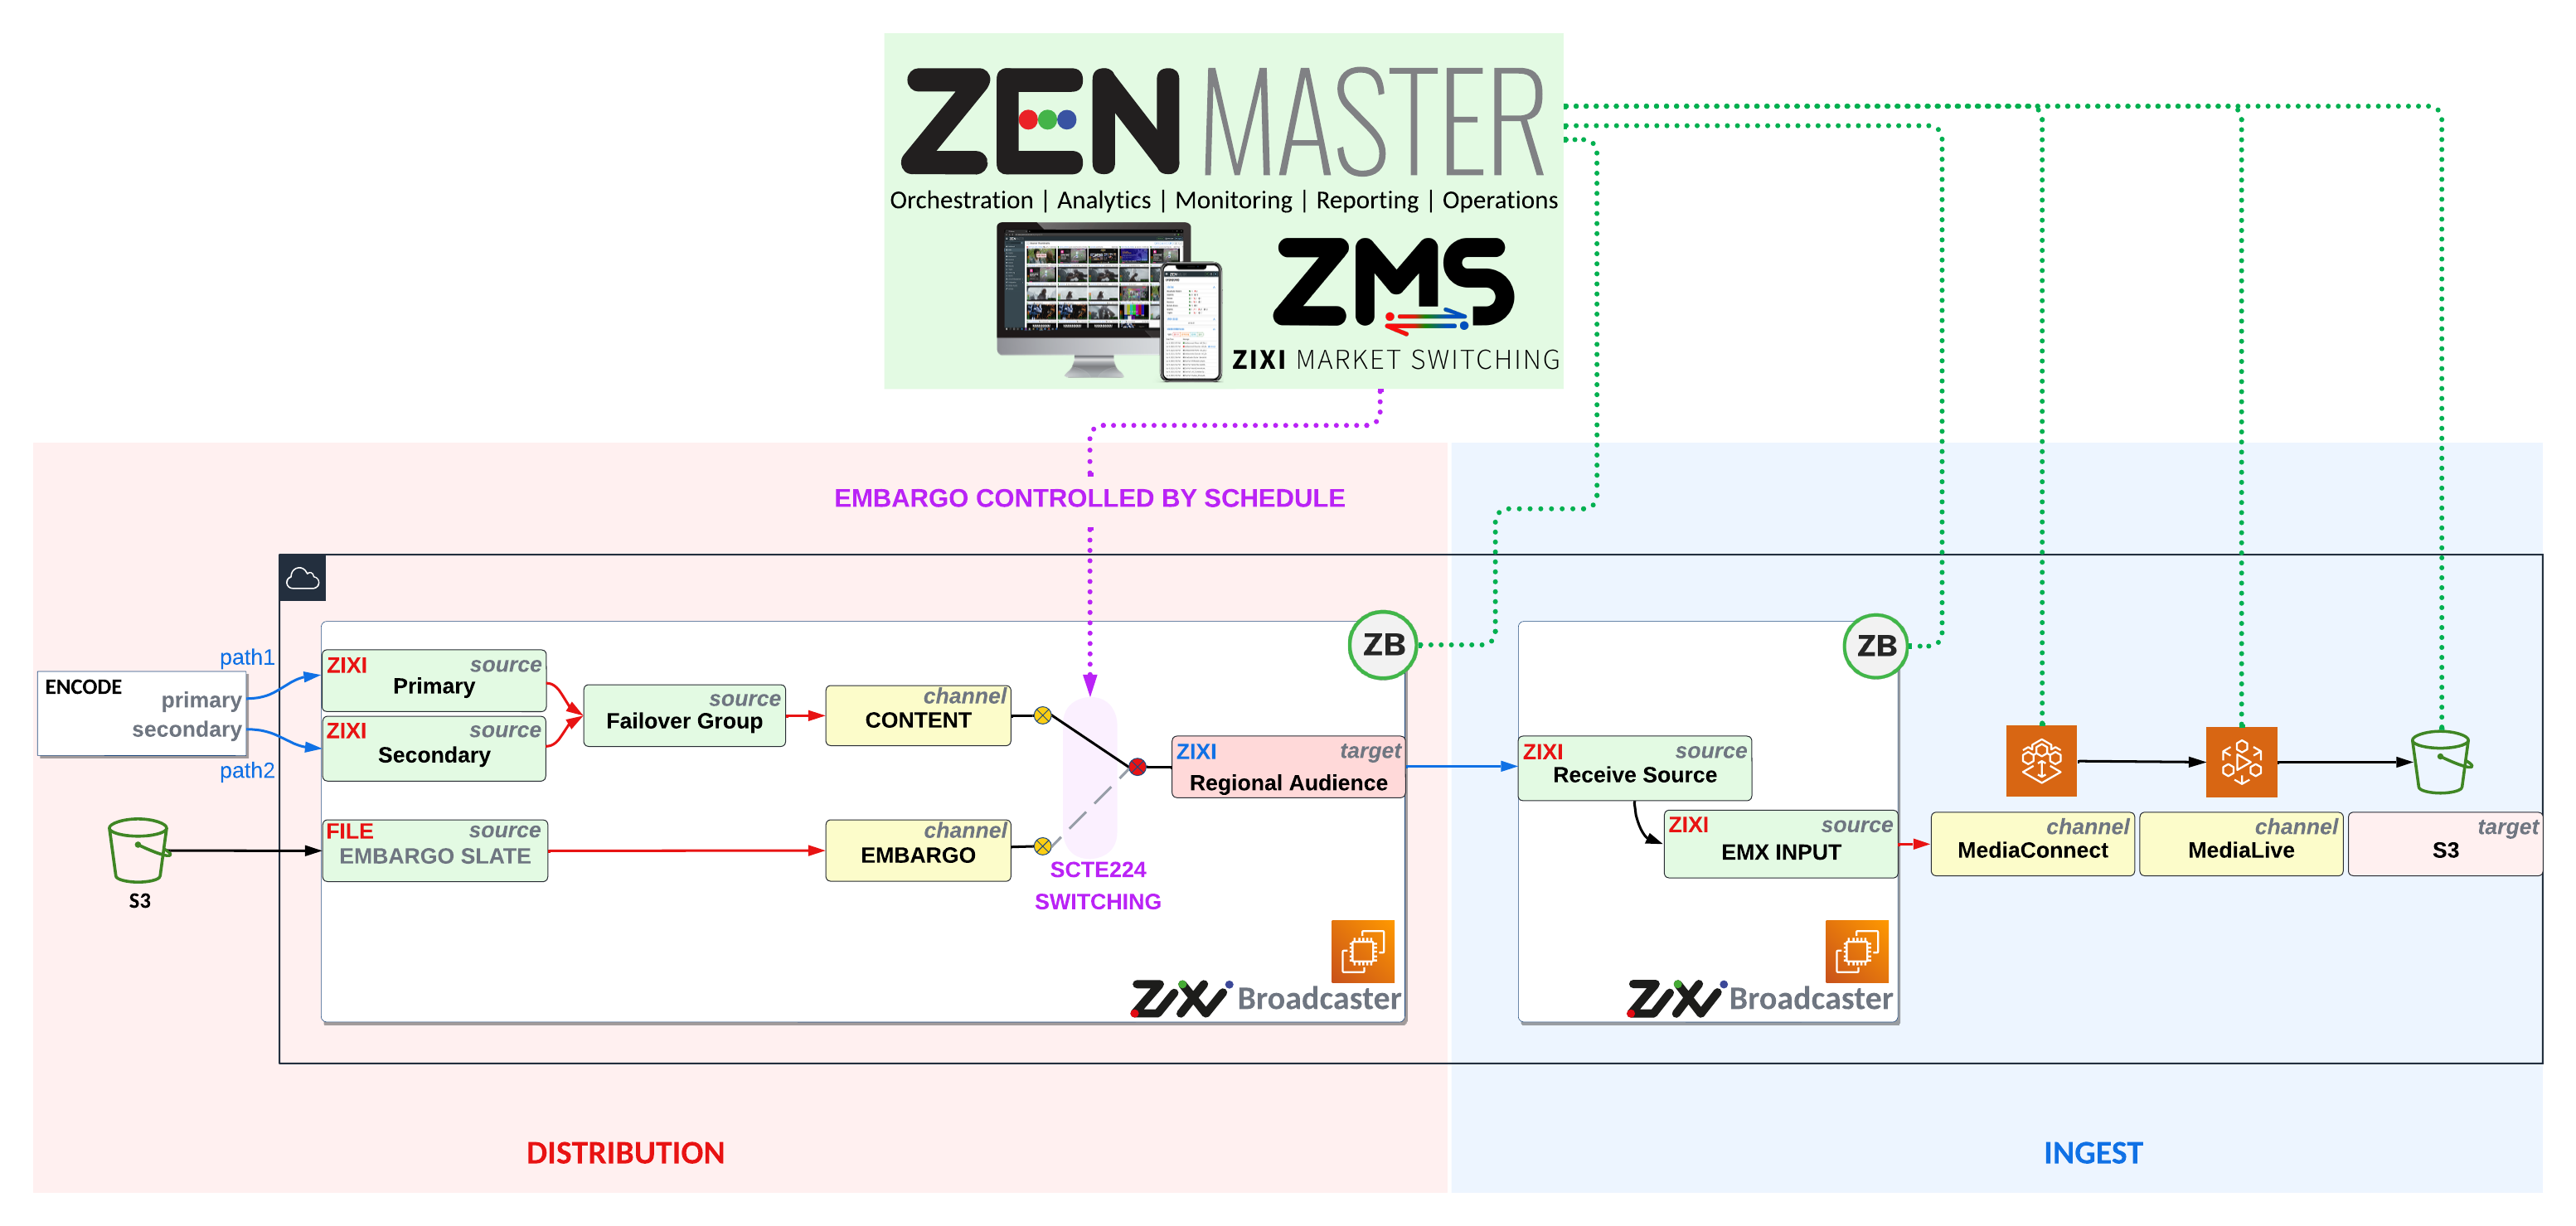
This lab showcases Zixi's ZEN Master platform for resilient transport stream distribution with full monitoring and orchestration, as well as its ability to manage and monitor AWS compute and media infrastructure — all from a single pane of glass.
In Parts 1–3, you play the role of a content provider building a resilient global channel distribution. You'll ingest a redundant source using hitless failover and distribute it downstream using the Zixi protocol.
In Parts 4–5, you switch hats to a content platform receiving the provider's feed. You'll ingest the Zixi distribution and deliver it through an AWS HLS-based D2C pipeline — all managed within the same ZEN Master instance.
In Part 6, you return to the content provider role to demonstrate how a SCTE-224 schedule can selectively embargo specific regional distributions — switching them to slate automatically, without manual intervention.
Broadcaster Cluster Setup
You will provision a Zixi Broadcaster cluster in ZEN Master backed by an AWS EC2 instance in us-east-1. This broadcaster will be used to ingest, process, and distribute the channel throughout the lab.
- In ZEN Master, navigate to the Broadcasters tab and click Add on the Clusters view
- Set Name to bl-your-name
- Select the tag owner=nab2026_aws_builderlab
- Set Events Configuration Profile to default
- Select Dual Mode
- Set Management Type to AWS-account
- Set Region to US East (N. Virginia)
- Select key pair nab-aws-builder-lab
- Set VPC to vpc-0a4c3b135645df943 | Default
- Set Subnet to subnet-0a5d332fe36ccd20a | us-east-1a
- Set Security Group to nab-aws-builder-lab
- Confirm Architecture is 64-bit (Arm) and instance type is t4g.small
- Set Activation Key to 6f4f-0056-9da3-01aa-ef89
- Click the Key icon to generate a random API Password
- Set Broadcaster Version to 18.11
- Click Save
- Click Add Broadcaster within your new cluster
- Name it bl-your-name-distribution and click Save
- Wait a few minutes and confirm the Broadcaster status shows as Active
- In the meantime, go ahead and spin up another Broadcaster named bl-your-name-ingest for the second part of this lab.
Source Configuration
Add three sources to your broadcaster: a primary Zixi Pull source, a secondary Zixi Pull source for redundancy, and a file-based embargo slate. Then combine them with a hitless failover source group.
- Navigate to the Sources tab and click Add
- Select source type Zixi
- Set Name to bl-source-yourInitials-primary
- Set tag to owner=nab2026_aws_builderlab
- Set Mode to Pull
- Set Host to builder-lab-contribution-alqyk.nab2026awsbl.io.zixi.com
- Set Stream ID to bl-source-origination-primary-smnkorp
- Set Ingest Cluster and Target Broadcaster to your distribution broadcaster
- Click Save
- Navigate to the Sources tab and click Add
- Select source type Zixi
- Set Name to bl-source-yourInitials-secondary
- Set tag to owner=nab2026_aws_builderlab
- Set Mode to Pull
- Set Host to builder-lab-contribution-mqbgy.nab2026awsbl.io.zixi.com
- Set Stream ID to bl-source-origination-secondary-serk24p
- Set Ingest Cluster and Target Broadcaster to your distribution broadcaster
- Click Save
- Navigate to the Sources tab and click Add
- Select source type File
- Set Name to bl-source-yourInitials-slate
- Set tag to owner=nab2026_aws_builderlab
- Set Broadcaster to your distribution broadcaster
- Enter URL: https://zixi-file-sources.s3.us-east-1.amazonaws.com/ts/EmbargoSlate_720_CBR.ts
- Click Save
- Navigate to the Sources tab and click Add
- Select Failover Source
- Set Name to bl-source-yourInitials-fo
- Set tag to owner=nab2026_aws_builderlab
- Add your primary and secondary sources to the failover group
- For Failover Mode choose Content Hitless Merge (handles cases with or without RTP headers)
- Set Ingest Cluster and Target Broadcaster to your distribution broadcaster
- Click Save
Channels & Targets
Create two passthrough channels — one for the live content and one for the embargo slate — then define a Zixi Pull target that your downstream affiliate (or your future self!) will use to receive the feed.
- Go to the Channels tab and click Add
- Select Passthrough Channel
- Set Name to bl-channel-yourInitials-content
- Set tag to owner=nab2026_aws_builderlab
- Set Broadcaster Cluster and Target Broadcaster to your distribution broadcaster
- Set Source to your failover source bl-source-yourInitials-fo
- Under Advanced, set External ID to bl-content (used for SCTE-224 schedule binding in Part 6)
- Click Save
- Go to the Channels tab and click Add
- Select Passthrough Channel
- Set Name to bl-channel-yourInitials-embargo
- Set tag to owner=nab2026_aws_builderlab
- Set Broadcaster Cluster and Target Broadcaster to your distribution broadcaster
- Set Source to your file slate bl-source-yourInitials-slate
- Under Advanced, set External ID to bl-slate
- Click Save
- Open your content channel and navigate to its Targets tab
- Click Add Target and select Zixi
- Set Name to bl-target-yourInitials
- Set tag to owner=nab2026_aws_builderlab
- Set Type to Pull
- Enter your initials in the Receiver Name/ID field
- Under Advanced, set External ID based on your seat location:
- Click Save
Platform Ingest via MediaConnect
Switch hats — you are now the receiving content platform. You'll ingest the Zixi Pull feed you just created and route it into an AWS MediaConnect flow to feed your D2C pipeline.
First we need to create a Zixi source that pulls from the target we just built on the distribution side. You'll need the host and stream ID from the target's configuration — keep that browser tab open alongside this one.
- In the new browser tab (your distribution target), click the three dots (⋮) kebab menu in the top right and select Configuration — note the host and stream ID shown
- Back in the main tab, navigate to the Sources tab and click Add
- Select source type Zixi
- Set Name to bl-source-yourInitials-receive
- Set tag to owner=nab2026_aws_builderlab
- Set Mode to Pull
- Enter Host from the Target configuration menu
- Enter Stream ID from the Target configuration menu
- Set Ingest Cluster and Target Broadcaster to your ingest broadcaster
- Click Save
- Go to the Sources tab and click Add
- Select AWS MediaConnect under the AWS Media section
- Set Name to bl-source-yourInitials-emx-in
- Set tag to owner=nab2026_aws_builderlab
- Confirm Protocol is set to Zixi
- Set Application to Broadcaster
- Set Broadcaster to your ingest broadcaster
- Set Source to bl-source-yourInitials-receive
- Set CIDR to 0.0.0.0/0
- Click Save
- Go to the Channels tab and click Add
- Select AWS MediaConnect Flow
- Set Name to bl-yourInitials-emx
- Set tag to owner=nab2026_aws_builderlab
- Select Create New
- Set AWS Account to AWS-account
- Set Region to US East (N. Virginia)
- Set Availability Zone to us-east-1a
- Set Source to bl-source-yourInitials-emx-in
- Click Save to spin up the MediaConnect Flow
MediaLive HLS Delivery
Create an AWS MediaLive channel fed from your MediaConnect Flow, configure a multi-rendition HLS ladder to S3, and verify the stream end-to-end with VLC.
- Navigate to Channels and click Add
- Select AWS MediaLive Channel
- Set Name to bl-yourInitials-eml
- Set tag to owner=nab2026_aws_builderlab
- Set AWS Account to AWS-account
- Set Region to US East (N. Virginia)
- Set Availability Zone to us-east-1a
- Set Role ARN to MediaLiveAccessRole
- Set Source to AWS MediaConnect Flow and select your flow bl-yourInitials-emx
- Check the Disabled checkbox (we will enable it shortly)
- Click Save
- Navigate to the Targets tab and click Add
- Select MediaLive HTTP Output
- Set Name to bl-yourInitials-eml-out
- Set tag to owner=nab2026_aws_builderlab
- Set Channel to bl-yourInitials-eml
- Set Type to S3 Bucket
- Set Bucket to s3://nab2026-awsbl/your-name
- Add renditions: 480p and 320p
- Click Save
- In ZEN Master, navigate to Channels and find your MediaLive channel
- Enable the channel to start the video pipeline
- Enter your stream URL below and click Play to verify
SCTE-224 Embargo Schedule
This section is an instructor-led demo. Watch how ZEN Master's SCTE-224 integration can selectively switch specific regional outputs to slate on a schedule — using the external IDs and channels you configured in earlier steps as the binding mechanism.
SCTE-224 is the industry standard for media audience restriction policies. ZEN Master exposes an ESNI (Event Scheduling and Notification Interface) endpoint that accepts a SCTE-224 XML schedule via a standard PUT request authenticated with AWS Signature Version 4.
Once received, ZEN Master parses the policy content actions and maps them to channels and targets using the External ID fields set earlier — bl-content, bl-slate, bl-region-1, bl-region-2. No manual switching is needed at run time.
When an embargo window is triggered for a given region, ZEN Master automatically routes that target's output to the slate channel. When the window closes, it restores the live content — seamlessly, on schedule.
A SCTE-224 schedule can act on either Time based triggers or SCTE-35 Signaling observed on the content. In this case, we're just using a simple time based schedule set to apply blackouts every 30 seconds.
The instructor sends the SCTE-224 schedule XML via an authenticated HTTP PUT to the ZEN Master ESNI endpoint, signed with AWS Signature Version 4. This is exactly how a rights management system or scheduling platform would deliver embargo policies in a production workflow.
In ZEN Master, navigate to the ESNI schedule view to see the embargo windows visualized in playlist format, with each row mapped to appropriate content change event. You can also verify that your External IDs have been correctly resolved.
As embargo windows become active and embargo policies are triggered, watch the affected target in ZEN Master reflect the source switch in real time. No manual action is required — the platform handles routing automatically based on the schedule. In this case we are using a Time based schedule, but the ESNI backend can respond to matching SCTE-35 on the channel as well.
Keep your stream player from Part 5 open. When your region's embargo window is active, the HLS output will switch from live content to the embargo slate. When the window closes, the content is automatically restored.
You successfully provisioned a Zixi Broadcaster cluster in AWS, ingested a resilient dual-path source with hitless failover, distributed via Zixi Pull to an affiliate, ingested through AWS MediaConnect, transcoded with MediaLive to HLS, and demonstrated SCTE-224 rights management — all orchestrated from a single ZEN Master platform.